PART 1
Using Easy Tonemapper
What the plugin does, whether you need it, and how to use it. The technical reference below explains exactly what it changes.
What it does
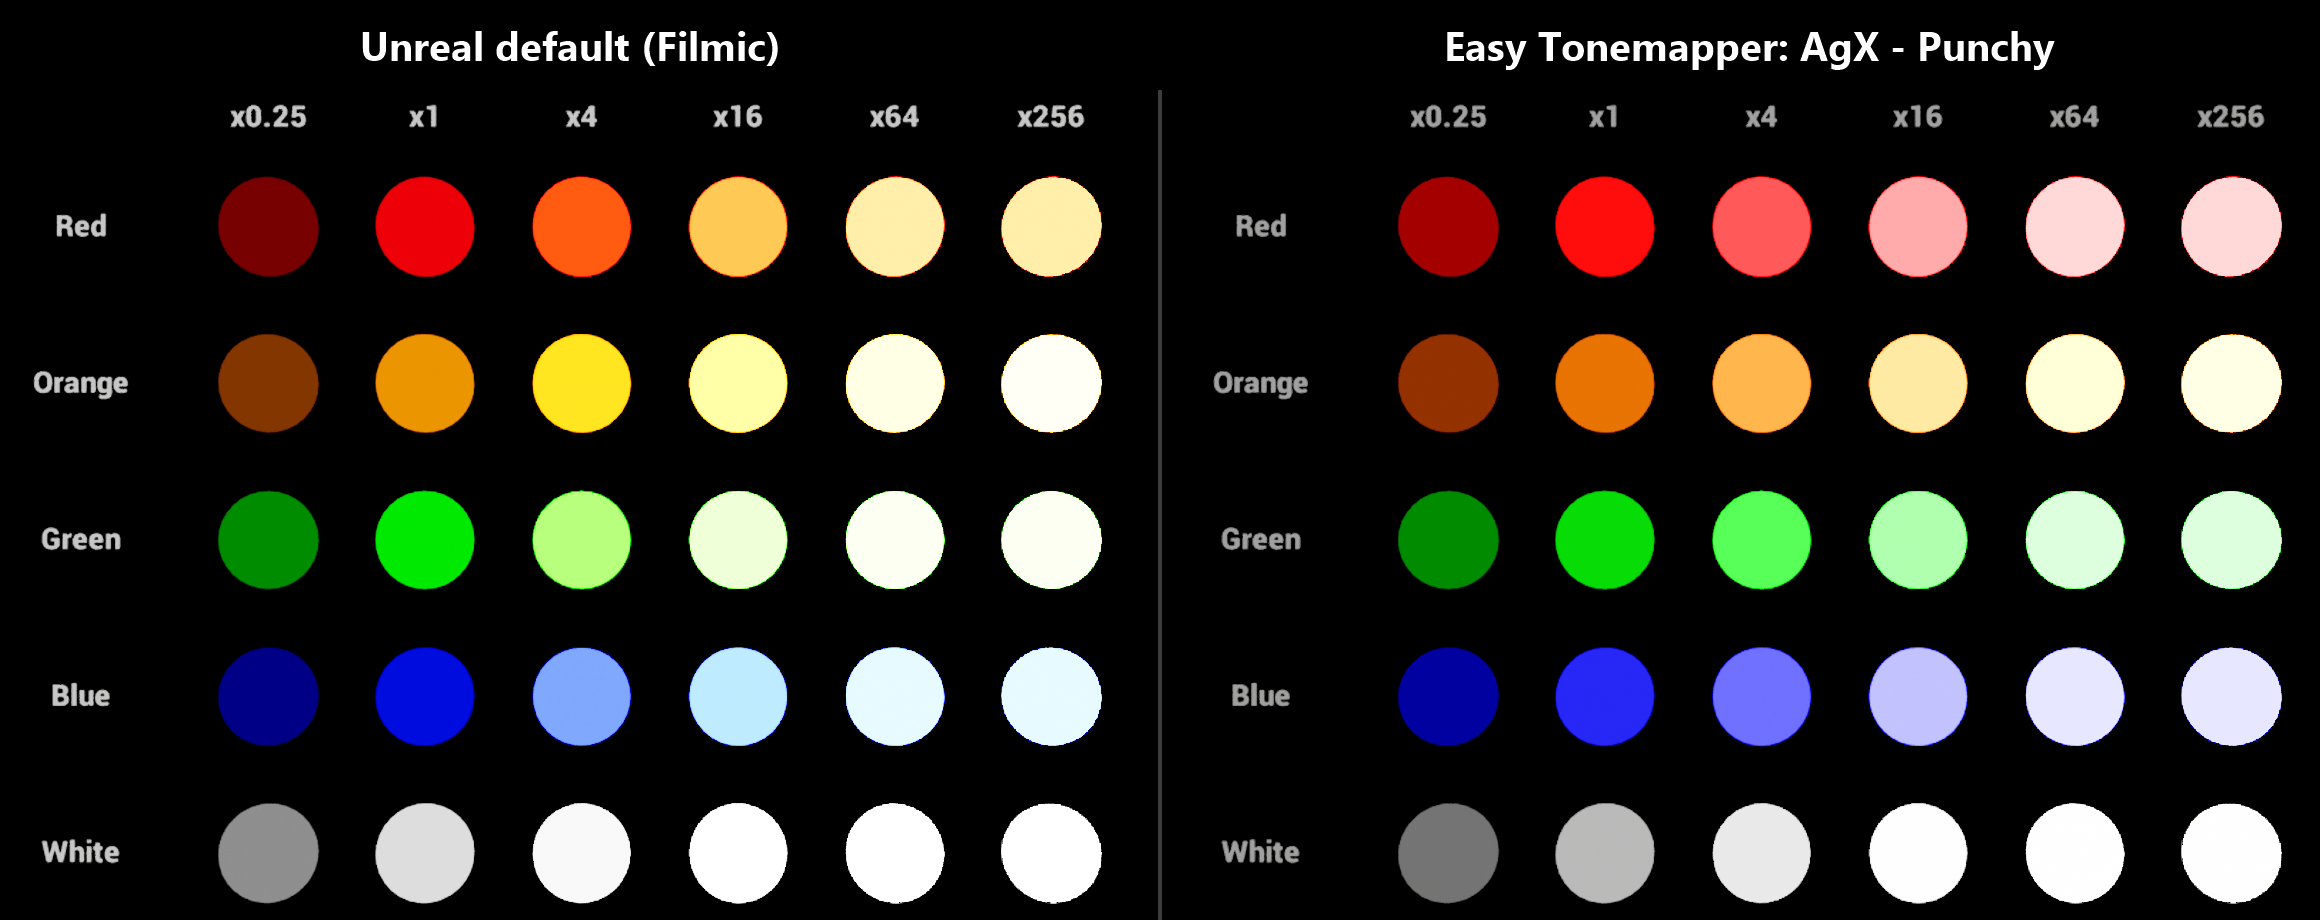
Unreal renders your scene with a far wider range of brightness than a screen can show. A tone mapper squeezes that range down into the final image. Unreal's default, Filmic, handles very bright, saturated colour in a particular way: a bright red light can drift toward orange, and strong colours wash out toward white.
Easy Tonemapper replaces Filmic with a tone mapper of your choice. Exposure, bloom and your Post Process Volume colour grading carry on as before. The one exception is Blue Correction, an ACES-specific adjustment, which is switched off by default (see Settings).
Is it right for your project?
Likely a good fit if
- your project is on UE 5.0 – 5.7, where Unreal has no built-in alternative to Filmic
- your scenes have strong, colourful light — neon, fire, magic, sci-fi glow, stylised lighting. This is where the difference is clearly visible.
- you make games or other real-time projects, where what Unreal renders is the final image
- you want to match the look of Blender's AgX
- you do product or archviz work where colours need to stay true (Khronos PBR Neutral)
Probably not needed if
- your scenes use natural light and already look right to you under Filmic — the difference there can be subtle
- you render cinematics out of Unreal and grade them afterwards in DaVinci Resolve or Nuke
- you're on UE 5.8 and happy with Epic's free Standard ACES option
- you need HDR output. It isn't supported yet, but it's planned for an upcoming update (see Roadmap)
A quick way to judge: open the included test chart, or put a bright red or blue light in one of your scenes, and compare Filmic with AgX.
Before you start
- The plugin changes one engine file while the editor is open. Unreal offers no way for a plugin to change its tone mapper and keep its own colour grading without editing this file. The original is backed up first and restored when you close the editor, or at the next launch after a crash. Your tone mapper choice stays saved in your project. See Safety and recovery.
- Your engine install must be writable. Standard Epic Games Launcher installs are. If yours isn't, the plugin tells you and changes nothing.
- If your studio forbids modifying the engine installation, don't use this plugin.
- On UE 5.8, try Epic's option first: Post Process Volume → Film → Method → Standard ACES. It's free and may be all you need.
- Existing scenes will look different after switching, and scenes tuned under Filmic may need some re-grading. That's true of any tone mapper change.
Quick start
- Install the plugin from Fab (or copy the
EasyTonemapperfolder into your project'sPluginsfolder), enable it in Edit → Plugins, and restart the editor. - Open the Easy Tonemapper menu from any of these:
- the Easy Tonemapper button in the level editor toolbar
- Tools → Rendering → Easy Tonemapper
- Project Settings → Plugins → Easy Tonemapper
- Choose a tone mapper from the drop-down list. It's applied straight away: the shader recompiles in a few seconds and the viewport updates. The menu always shows the tone mapper that's active.
To go back to Unreal's default at any time, choose Restore Engine Defaults.
Test chart
The plugin includes a small map that shows what a tone mapper does to bright colour: rows of glowing spheres in red, orange, green, blue and white, each column two stops (4×) brighter than the one before. Exposure is fixed and bloom is off, so the tone mapper is the only thing that changes.
- In the Content Browser, open Settings and tick Show Plugin Content.
- Open Easy Tonemapper Content → Demo → Maps → ToneMapperTestChart.
- Switch tone mapper and compare the right-hand columns.
What to look for: under Filmic, bright red turns orange and then yellow, bright green turns yellowish, and bright blue turns pale cyan. Under AgX each colour keeps its hue as it fades to white. In the first two columns, at ordinary brightness, the difference is small.
For the chart's intended framing, right-click Chart Camera in the Outliner and choose Pilot.
Choosing a tone mapper
| Tone mapper | Choose it when |
|---|---|
| Engine Default (Filmic) | You want stock Unreal. The engine file is left identical to a clean install. |
| AgX – Neutral | You want AgX without a creative look. The best place to start. |
| AgX – Golden | You want AgX with a warm, slightly desaturated look. |
| AgX – Punchy | You want AgX with more contrast and saturation. |
| Reinhard | You want a simple reference curve to compare against. |
| Uncharted 2 (Hable) | You want a classic game-style filmic curve. |
| GT (Uchimura) | You want the most control over shadows, midtones and highlights. |
| Khronos PBR Neutral | Colours must stay true to a real reference — archviz, product shots. |
| Lottes | You want a simple curve anchored at middle grey, without a strong look. |
Reinhard, Uncharted 2, GT and Lottes keep very bright, saturated lights fully saturated (and can shift orange towards yellow) instead of fading them to white. For bright coloured lights, choose AgX or Khronos PBR Neutral. The test chart shows the difference.
Tuning the look with the Film sliders
While a tone mapper other than Engine Default is active, the five Film sliders in your Post Process Volume adjust that tone mapper instead of Filmic. Changes show up immediately, with no shader recompile — a quick way to find the look you want.
An untouched Post Process Volume gives each tone mapper's standard look; nothing changes until you move a slider. Like any post-process setting, the sliders work per volume, but most projects set them once for a consistent look.
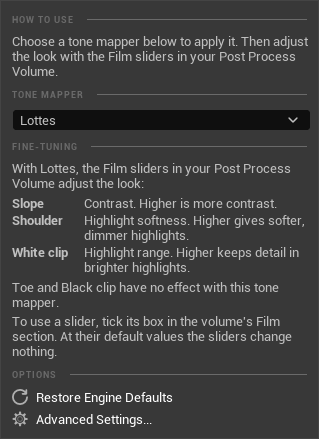
To use a slider, tick its box in the volume's Film section. The Easy Tonemapper menu shows what each slider does for the tone mapper you've selected, under Fine-Tuning. For AgX, for example:
| Film slider | What it does with AgX |
|---|---|
| Slope | Brightness. Higher is brighter. |
| Toe | Midtones and shadows. Higher is darker and punchier. |
| Shoulder | Saturation. Higher is more colourful. |
| Black clip | Shadows. Higher turns shadows black sooner. |
| White clip | Highlights. Higher keeps more highlight detail but looks darker. |
The full table is in Film slider mapping. To leave the sliders alone, turn off Map Film Sliders To Operator.
Settings
Project Settings → Plugins → Easy Tonemapper, or Advanced Settings... in the Easy Tonemapper menu.
| Setting | Default | What it does |
|---|---|---|
| Tonemapper | Engine Default | The active tone mapper. |
| Map Film Sliders To Operator | On | Lets the Film sliders adjust the active tone mapper. |
| Disable Blue Correction | On | Turns off Blue Correction, an ACES-specific adjustment, while another tone mapper is active. |
Every change is applied as soon as you make it, here or in the menu.
Settings are saved in Config/DefaultEasyTonemapper.ini, so they can go into source control and be shared with your team.
Packaging your game
The tone mapper you've selected is compiled into your game's shaders when you package, so the packaged game looks the same as the editor. The plugin's code is not included in packaged builds.
If your project doesn't list which maps to package, Unreal packages every map and asset it can find, and that includes the plugin's test chart (about 320 KB). To leave it out, add /EasyTonemapper/Demo to Project Settings → Packaging → Directories to never cook.
Movie Render Queue
Render (Local) and Render (Remote) both use the tone mapper you've selected.
Render (Remote) starts a second Unreal process. Its log says Easy Tonemapper is inactive there, because your editor already owns the engine file. That's expected: the render still uses your editor's tone mapper. Keep the editor open until the render finishes.
Troubleshooting
"Inactive: another editor (...) owns the engine file" at the top of the menu
Another editor on the same engine version has already applied its tone mapper, and the viewport shows that one. Close the editor named in the message and restart this one.
"Not applied: ..." at the top of the menu
The last change couldn't be applied; the rest of the message says why, and the entries below explain the common causes.
"Easy Tonemapper cannot write to the engine shader directory" or "... is marked read-only, so Easy Tonemapper cannot patch it"
Your user account can't change the engine install. Grant write permission to the engine folder (or clear the read-only flag on the file), then try again.
"Anchor not usable ... engine version is probably not supported yet"
This engine version isn't supported. Nothing was changed.
"Could not read the plugin shader ... Reinstall Easy Tonemapper"
Part of the plugin is missing. Reinstall it.
"UnrealEditor.exe - Bad Image ... is either not designed to run on Windows or it contains an error ... Error status 0xc0e90002", or the plugin doesn't load on Windows 11
This is Windows Smart App Control blocking a plugin file, not a fault in the file. Smart App Control blocks program files that aren't digitally signed unless Microsoft's online service already recognises them. Unreal plugin files usually aren't signed, whether they come from Fab or are built on your computer, so this can happen with any code plugin, not only this one. Its decisions can also vary: the same file can be blocked once and allowed on the next launch.
- Close the message and start the editor again. It often loads on the next try.
- If it keeps happening, the setting is in Windows Security → App & browser control → Smart App Control. Microsoft offers no way to allow individual apps, so the only choice there is on or off for the whole computer. Whether to change it is up to you.
The viewport didn't change
Look for an error notification in the bottom-right corner of the editor; it explains what went wrong. On UE 5.8, also check the Post Process Volume's Film → Method is set to Filmic; Standard ACES is left untouched.
Something looks wrong
Choose Restore Engine Defaults, or disable the plugin and restart. As a last resort, Verify the engine in the Epic Games Launcher, which restores every engine file.
Still stuck? Ask in the SDProjects Discord support channel ↗.
Removing the plugin
- Choose Restore Engine Defaults from the Easy Tonemapper menu.
- Close the editor.
- Delete the
EasyTonemapperplugin folder (or uninstall it through the Launcher). You can also deleteSaved/EasyTonemapperandConfig/DefaultEasyTonemapper.inifrom your project.
Roadmap
Planned updates (none of these are included in the current version):
- HDR output.
- Before/after images: save your viewport side by side, Unreal's default next to your tone mapper.
- Match Blender out of the box: an AgX option that matches Blender's default look, so scenes look the same in Blender and Unreal.
PART 2
Technical reference
For technical artists and programmers who want to know exactly what the plugin changes.
Where it hooks into the pipeline
Unreal bakes tone mapping into a 3D colour-grading LUT built in /Engine/Private/PostProcessCombineLUTs.usf. In that pass:
- Post Process Volume grading (
ColorCorrectAll: white balance, saturation, contrast, gamma, gain, offset) runs in scene-referred linear space. - The tone curve runs —
FilmToneMapfor Filmic. - A user Color Grading LUT, if any, is applied to display-referred values.
Easy Tonemapper replaces the call in step 2. Steps 1 and 3 are unchanged, and so are Tone Curve Amount and the 5.8 Standard ACES path.
Why not a LUT, a post-process material or a Scene View Extension
- Filmic applies its S-curve to each channel separately, in AP1. That's what shifts the hue of bright, saturated colour, and grading can't prevent it because grading runs before the curve.
- A Color Grading LUT runs after the curve, so it can't recover what the curve has already compressed.
- A post-process material in the Replacing the Tonemapper slot needs no engine edits, but Unreal then skips building its colour-grading LUT, so Post Process Volume grading stops applying. (Checked in the UE 5.0 and 5.8 renderer.)
- A Scene View Extension subscribed to
EPostProcessingPass::ReplacingTonemapperdoes the same: the LUT pass is skipped, and the extension receives only scene colour and bloom, so exposure, local exposure, vignette, film grain, chromatic aberration and output encoding all have to be reimplemented. That pass only exists from UE 5.6. (Checked in the UE 5.8 renderer and in all nine engine versions' headers.)
Swapping the curve inside the LUT build is the only way to change it while keeping Unreal's own grading path.
What changes in the engine file
The plugin edits PostProcessCombineLUTs.usf in place:
- The call
FilmToneMap( ColorAP1 )is rerouted toEasyTonemapper_ToneMap( ColorAP1 ). - The two Blue Correction lines are scaled by a define, so the setting can switch it off.
- After
#include "TonemapCommon.ush", one fenced block is inserted: the current settings as#defines, followed by the plugin's shader code written out in full.
The code is inlined rather than included from the plugin's folder so that any project on the same engine version can compile the file, including projects that don't have the plugin. Before writing, the plugin checks each anchor appears exactly once, and refuses shader code that includes anything outside /Engine/. No copy of an Epic shader file is shipped or swapped in.
Safety and recovery
- Backup first. The original is copied to
<Project>/Saved/EasyTonemapper/Backups/with a manifest recording its hash and engine version. The patched file starts with a marker carrying the same hash. - Refuses rather than guesses. If any anchor is missing or appears more than once, for example on an unsupported engine version, nothing is written.
- Restored automatically on editor exit and from the crash handler. If neither got the chance, for example after a forced shutdown, the next launch of a project with the plugin restores it.
- Engine Default leaves the file byte-identical to a clean install.
- Standard ACES is never touched.
Several editors and engine versions
Projects on the same engine version share one engine file, so the plugin holds one lock per engine version (in %LOCALAPPDATA%/EasyTonemapper). Only the first editor opened on that version applies its settings; any other shows a warning and leaves the file alone. While the first is open, other projects on that engine version — with or without the plugin — compile the patched file and use its tone mapper. A lock left behind by a crashed editor is taken over automatically.
Different engine versions have separate locks and don't affect each other.
Film slider mapping
| Tone mapper | Slope | Toe | Shoulder | Black clip | White clip |
|---|---|---|---|---|---|
| AgX (all three looks) | Look slope (gain) | Look power | Look saturation | Exposure floor, 8 stops across the slider | Exposure ceiling, 8 stops across the slider |
| Reinhard, Uncharted 2 | Exposure into the curve | – | – | – | – |
| GT (Uchimura) | Contrast a | Toe curvature c | Linear section start m | Black lift, up to 0.25 | Peak brightness P |
| Khronos PBR Neutral | Highlight desaturation | – | Compression start | – | – |
| Lottes | Contrast a | – | Roll-off strength 1 − d | – | Brightest input mapped to white |
Each slider is measured from its engine default (Slope 0.88, Toe 0.55, Shoulder 0.26, Black clip 0.0, White clip 0.04). The sliders are already bound shader parameters on the LUT pass, which is why changes need no recompile.
For GT and Lottes, the resulting parameters are clamped to the ranges where the curve rises smoothly to white with no dips or overshoot, checked numerically over every combination of the sliders across their full range. Pushing a slider to its end simply stops having an effect past that point.
Operators
| Tone mapper | Notes |
|---|---|
| AgX | Troy Sobotka's AgX, using Benjamin Wrensch's real-time implementation. Evaluated in linear sRGB and converted back to AP1. |
| Reinhard | x / (1 + x). |
| Uncharted 2 | John Hable's filmic curve; white point 11.2, exposure bias 2.0. |
| GT (Uchimura) | Hajime Uchimura's 2017 published curve. Not Polyphony Digital's Gran Turismo 7 transform, which has never been released. |
| Khronos PBR Neutral | The Khronos Group's PBR Neutral tone mapper, designed to keep base colours close to their reference. |
| Lottes | Timothy Lottes' curve, anchored at middle grey. |
Performance
The tone curve is evaluated while Unreal builds its colour-grading LUT, not per pixel, so the per-pixel cost is the same as Filmic. The plugin's modules are UncookedOnly and Editor, so neither is included in packaged builds.
Known limitations
- SDR output only for now. HDR output is planned (see Roadmap).
- Auto-exposure on UE 5.6 and later meters through Epic's Filmic curve (
PostProcessHistogramCommon.ush) rather than the selected tone mapper. - Windows only. Tested with Epic Games Launcher engine installs; engines built from source have not been tested.
Automation tests
Seven tests ship with the plugin. Run them from the editor console:
Automation RunTests EasyTonemapperThey check that a patch round-trips back to byte-identical stock, that the patched file is self-contained, that unsafe shader code is refused, that settings survive a reload, and that the anchors still match your installed engine. That last check reads the engine file only; no test writes to your engine.
Licence and credits
Copyright © 2026 SDProjects. Licensed under the Fab Standard License, which licenses plugins per user: each person using the plugin needs their own licence.
Easy Tonemapper builds on published work by Troy Sobotka (AgX), Benjamin Wrensch (real-time AgX), Erik Reinhard et al., John Hable, Hajime Uchimura, Timothy Lottes and the Khronos Group. Full attribution and licence texts are included with the plugin, in Source/ThirdParty/THIRD_PARTY_NOTICES.md and beside the code they cover under Source/ThirdParty.
Unreal® Engine is a trademark of Epic Games, Inc.